Showing posts with label Distressing. Show all posts

Saturday, 22 October 2016

Just back from ...

... a week away with the OH.  We went on a Haven holiday in Norfolk, staying in a caravan.  Not an area we've visited before and can't say as we've visited much of it now although we did visit a few attractions.  What we've seen of the area has been mainly by getting from a to b.  We did do a day in Great Yarmouth but I'll go into it all in a bit more depth when I've sorted some photos out.  Still managed to take a fair few of them - ROFL!

The day before we went away there was another Clair workshop *grin*  I loved the card we made this time round.  I adapted it slightly from the planned one but not by much.  We did a bit of distressing.  Funny how I never used to like the distressed look and now I love it and doing it.  Clair had designed the card with wide, lime'ish green grosgrain ribbon as an embellishment.  I wasn't so keen on the green as it didn't tie in with anything on the rest of the card.  I was wearing a navy sweater that had hanging ribbon ... well, not for long did it 'cos I cut it off to use on the card *LOL*
The butterfly stamps were a Papermania Urban collection stamp set - 3 butterflies on the stamp, coloured with distress inks and fussy cut.  The script background was a retired Stampin' Up one.  The other stamps were JustRite and dies were matching Spellbinders label dies of various types..  Cardstock was Stampin' Up.  Not obvious in the photos but the butterfly wings were coated in Wink of Stella.

Thanks for dropping by .....

Follow my blog with Bloglovin

Monday, 22 September 2014

Nothing of ...

... much interest has happened this week.  I've made a start on decluttering and reorganising the kitchen but it's not going to be done overnight.  I've ordered some new fittings for cupboards to make them more 'user friendly' - lol!  May be a few days before they're all together but in the meantime I'll continue to work on the areas that aren't being 'upgraded'.

OH should have had his 4 weekly Zoledronic Acid infusion on Friday but it never happened.  Transport never arrived so it's been rearranged for Wednesday.  Just hope those few days delay aren't to much of a problem as it's supposed to be given every 3 to 4 weeks and he's on a 4 weekly cycle.

It has been very hot!  Apparently it's the hottest September, so far, ever - well, since records began.  Thursday my car thermometer didn't get below 30c and, at one point, it reached 34c when I was moving!  We've had a better couple of weeks than we had in August - with the exception of the day I went to London.  Weather is really laughing at me and I'm not yet over it *sad*

Weight loss (have I mentioned I've lost a fair bit of weight since April???) - I seem to have reached a plateau.  So close to being in the normal range of BMI that body seems to have decided it just doesn't want to be 'normal' - ROFL!  It needs a kick to get going again but I'm at a loss as to what to do about it.  I'm not on a diet, just being more careful with what and how much I eat.  I don't think reducing the amount down any more is really on, or the answer, but what to do?  I'm not putting on so I guess that's something.  Maintaining is better than increasing.  Perhaps it'll start to decrease again soon.

I did have the fortnightly craft workshop run by Clair and we made a lovely card.  All Stampin' Up (I think) but we made our own embellishment using some WOW Melt It powder.  Certainly novel but don't think I can be bothered when a nice button would do the same job - lol!  May add some trails to the butterflies having looked at it again :)

The previous  workshops have also produced some great cards.  The following one was great fun - and messy :)  We made our own background on thick watercolour card.  Splodged (technical term) 2 or 3 inkpads onto a smooth service and misted with water until it started pooling then laid the card into it and swished it around a bit.  Then dried it and dabbed it back in again.  Repeated until happy with result.  Image stamped and embossed with white embossing powder.  A sheet of acetate cut to cover and matted onto the base card on dimensionals.  Insert was done to tone in with the remnants of the ink.  Love it!


This one - a great man's card.  Su's Lovely as a Tree stamp set and woodgrain embossing folder - all distressed and matted and layered.  Easy but very effective. First time I've done the reflection technique as well.  Impressed - lol!

It's been mentioned, in passing recently, that Jackie and I went to Sorrento, Italy in April 2013.  We did the usual touristy stuff and visited Herculaneum and Pompeii, did the Amalfi Drive and popped over to Capri, don't you know - lol!  Between us we took a lot of photos.  Not long after we got back I started the now obligatory photobook but it ground to a halt after a very short space of time.  I created a lot of photobooks last year and my mojo went on holiday and work on the Italian book ground to a halt until a few weeks ago when the mojo came back.  Photo book was finished and has been printed.  It was lovely reliving that holiday, especially as we've not had one this year (other than our group crafty week away).
http://www.photobox.co.uk/creation/2751011028

Thanks for dropping by .....

Follow my blog with Bloglovin

Thursday, 9 June 2011

Afternoon workshop ...

... with Alex Kamann, 3rd June.  White on White and they were stunning cards!

The first card was a small 4" x 4" one.  The card was embossed with a Sizzix embossing folder.  A strip of white card had a greeting stamped on a lower corner and then stuck to card base and trimmed to size. A plaque was cut from white Bazzill Bling (or similar) using the Spellbinders Labels Eighteen.  The flower was made from several layers of tissue paper cut with the Spellbinders Blossom 3, although any circle die/punch with a bit of shape to the edge would do.  Each layer was joined with a brad through the middle. Every layer was scrunched up then 'fluffed' out to make the flower.  Brad colour doesn't matter as it can't be seen.  A few leaves were punched and the flower and leaves were mounted onto the plaque which was then stuck to the card base.  Stickles glitter glue was dotted over the flower to lift it.


The second card.  This one was a 6" x 6" card.  A square, slightly smaller, was cut and embossed using a Sizzix embossing folder.  The edges were then distressed with Antique Linen from the Distressed Ink range. A plaque was cut using the Labels Eighteen set and the edges distressed as before.  A greeting was stamped in one corner of it, in the same ink so it all tied in.  

Using a slightly larger die from the Blossom 3 set, several layers of tissue paper were cut.  This time, before they were all put together, the edges of the shapes were lightly distressed and then they were all put together and 'scrunched' in the same way as the first flower.  A piece of vellum was stamped with a text background stamp using white Stazon and a couple of Martha Stewart butterflies punched from it.  Another piece of vellum was used to hand cut some leaf shapes and veins were embossed onto them.


The embossed square had a length of ribbon wrapped round it at the point where the embossing folder join was and then it was adhered to the card blank.  The label was attached using foam pads.  A foam pad was also used to attach the flower and then the leaves positioned and stuck with wet glue.  The butterflies were also attached with wet glue and, although the sample card didn't have them, I chose to add diamanté gems to lift them as the butterflies were a bit 'lost' against the textured background without.


I love these white on white cards although they're not the easiest things to photograph to show the detail involved.  I also love this flower.  It's so easy but so effective.

Managed to get instructions printed for the shoebox card and put into packs so they're now all done.  Just got to decide what I'm taking to our weekend and start getting it together.  Kindle, MP3 (perhaps), tools, and .... no idea!

Had a Groupon day yesterday. First I had a facial deal that was an experience!  Never had a facial like it before but for £14 it was exceptional value. Lasted 1½ hours and included a neck, shoulder and face massage - mind you, some of it seemed more of a slap around but it was very therapeutic. A young Chinese lady so think it was all based more on oriental methods than European.  Will I be going back?  You betchya! Even at the full £36 it would be well worth it.Thinking of trying her manicure, pedicure and one of her massages. If they're anywhere near close to what I've had by Balinese ladies she will be getting my repeat business.

The second one was the meal at The Brasserie in the Marina.  Paid £25 for a meal to the value of £52.  What I like about this Italian restaurant is that there's very little pasta on the menu. I had fillet steak medallions cooked with bacon and sliced parmesan with rocket garnish and seasonal veg, not that I had any veg as there was plenty on my plate without it - there being 2 steaks and 2 rashers and enough rocket and other leaf to make a small salad. Paul had veal cooked in some Italian way as his main and calimari as his starter (I had tiramisu for dessert, no starter). I tried his calimari but it's not something I've ever liked, no matter how many times I've tried it however ... this time I've got to say it was lovely. The best I've ever tried.  Beautiful meal and everything cooked to perfection.  We cabbed it there and back so were able to have a bottle of wine to round it all off and bonus, although pretty breezy and hence, chilly, it didn't rain, sleet, hail or snow - *lol* Lovely day all told.

Thursday, 25 November 2010

Beautiful Bubble Baubles Workshop

Friday 4th November - Morning session with Jane Gill (I love that designer - lol!)

2 cards made in the morning session.  One using the Woodware stamp set Bubble Wreath designed by Jane and the other using a Woodware peeloff of the same design.

This card was originally an A6 card (approx 6x4 inches) but I've altered it since I bought it home and it's now a 7x5 inch card.  A piece of A6 size cream card was embossed with the Crafts Too embossing folder, Baubles. A peeloff of one of the bubble ornaments (available in silver, gold, black & white) was stuck on and then blinged with anything to hand ... buttons, brads, sequins, gems, beads, microbeads, glitter glue, peeloffs - anything blingy that fits and glitter to fill the odd shapes.  The ornament string was drawn in using a toning Sakura Gellyroll pen.  After I got the card home I decided to cut the front off, ink the edges, layer it onto some toning mirri card and mount it onto a 7x5 inch pearlescent card blank and added a greeting. 


The following card used the bubble wreath from the stamp set previously mentioned.  The card was an A4 sheet folded in half lengthways.  The wreath was stamped onto the base of the card and, as with the peeloff, was blinged up with anything suitable to hand.  Narrow 3mm ribbon was stuck down for the string and a small bow tied and added.  A peeloff greeting was added for the finishing touch.

Once again photos are bad because of poor light.  It's the reason these are so late being posted because I've been trying to get pictures that do them justice.  I've given up!  You'll just have to believe me when I say that they are soooooooo much better in real life - *lol*

Enjoy!!
 

Wednesday, 24 November 2010

Christmas Trees Workshop #2

Saturday 30th October - Afternoon at the Glitterpot with Jane Gill.

More Christmas trees in the afternoon but this time different and based on Jane's Woodware clear stamp set ... Rocket Christmas. It is an extremely versatile set.  You can use as many or as few of the sections that make up the tree as you wish so you have choice as to what size your finished tree is.

With this card the tree, using some of the sections that make up the tree, was stamped with Versafine onto pearlescent cardstock and embossed with silver embossing powder. The inner parts of the tree sections were cut out and the pearlescent card was mounted onto some contrasting card stock.  The base card was covered with DP and the matted tree adhered to card.  A border was made from a piece of card matching the backing of the tree and punched with a Martha Stewart edging punch before being trimmed with a toning ribbon and placed on card.  The rosette was made from a 12 x 1 inch strip of DP matching the base of the card, scored  at regular intervals (approx 1/8inch or 1/2cm), fan folded then joined and flattened, adding a snowflake to cover centre hole.  The sentiment was stamped onto a shrink plastic label and, once shrunk, was tied to the tree with a piece of ribbon matching that used on the border.


The following card was so different but made using the same stamp set.  This card is ideal for using up those scrap oddments we save and then rarely do anything with. 

The base card was a piece of A5 card folded in half lengthways so, where the cards in the previous post were BIG, this one was quite small!  The base card was covered with a piece of Bazzill after having it's edges distressed.  A selection of the shapes were stamped onto the wrong side of Bazzill card in a variety of colours.   The shapes are then cut out, distressed with ink and a tree shape, of sorts, formed.  A couple of the pieces were put on using foam pads and a ribbon knot tied to one of them.  The tree pieces were then decorated - in this instance with glitter peeloffs and gems.  Quick, simple, funky and effective.  This tree could be larger or smaller and is certainly one to keep in mind for that oddment box!


Enjoy!!
 

Thursday, 4 November 2010

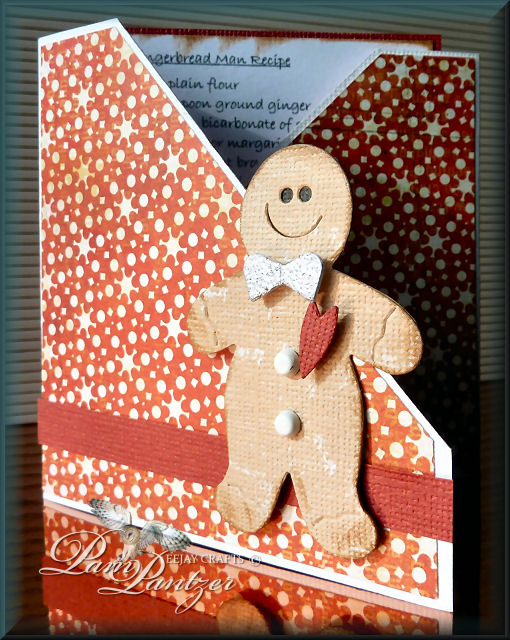
Christmas with Sizzix Workshop

Thursday 22nd October - afternoon at the Glitterpot with Jackie Huckstepp.

Using Sizzix dies in the afternoon, again with a selection of DP.


Ingredients:
Sizzix Original dies - Reindeer #2 & Gingerbread Man #3
DP - Basic Grey
Bazill card
Gems, paint (for icing sugar), gems, brads, bell & ribbon.
Large scalloped circle punch or nestie.

Enjoy!!
 

Wednesday, 3 November 2010

Embossable Christmas Workshop

Thursday 22nd October - morning at the Glitterpot with Jackie Huckstepp.

Yep, 2nd day running and another workshop at the Glitterpot. This time with Jackie using Crafts Too embossing folders and another selection of designer papers, punches, dies and embellishments.  Again, I'm not sure of the DP used but guess it's not really important as long as you can find what you like.


Ingredients
Embossing folders - Crafts Too: Noel,  Christmas Greetings & Cuttlebug: Swiss Dots
Core'dinations card for embossing/distressing
Nestabilities Labels One
Punches - Selection of snowflakes, corner rounder
Gems, ribbon, stickles, brads
DP - Noel card, Echo Park.

Enjoy!!
 

Tuesday, 2 November 2010

Christmas Flowers Workshop.

Wednesday 21st October - with Jane Gill at the Glitterpot

Getting a bit behind with my posting. Life keeps getting in the way! This workshop was an all day one and was based around the Woodware Christmas Flower combination punch (Jane's design). We made one card and matching tag in the morning and the same in the afternoon. I'm unsure of the ingredients of these cards but a selection of designer papers, nesties, Martha Stewart punches and stamps were also used.


Ingredients (as much as I remember)
Martha Stewart punches - Modern Garland & Lattice (although any would do)
Scallop circle and plain circle nesties.
Stamps - Merry, Merry Christmas from Woodware Rocket Christmas & Penny Black Christmas Text
Papers - Basic Grey
Stickles & Liquid pearls.

Enjoy!!

Saturday, 24 July 2010

Kenny K's Krafty Girlz Challenge #2

Well, if nothing else Kenny K's images have me colouring! I did this image while in Doncaster last weekend (report on that to follow) then, when I got back home, found that Kenny K's second challenge was a sketch. Sketches I can sort of do but real life has got in the way and I didn't think I'd be able to find the time to enter however .... last minute.com perhaps, but here it is! What's even more of a surprise, it got me using one of my purchases from last weekend ... the DP! When I saw it I just knew that it would suit these girlz - *lol* 

I still made a mistake on the card though.  Can't seem to make a card without one *sad face* Anyways, I had to go back to make it less obvious so hopefully nobody will notice.  The camera hasn't picked up the colours as they really are, which is unfortunate as they are much more distinctive than they seem and the hat is most definitely more red and the blues are actually quite a dark mauve.  The whole card is much more vibrant and psychedelic than piccie shows. Perhaps light is not good for photography ... *grin*


Ingredients:
Cream hammered card blank.
DCWV mat stack - Neutrals (love the range of colours in these)
Paper - DCWV Girls Square with Glitter (Nana's Kids Print range)
E-Line gems
Ribbon from stash
EK Success Edger Punch - Morocco Lace
QuicKutz Cookie Cutter - Nesting Label (cut, embossed and sponged with ink)
Image - Kenny K's All That coloured with Promarkers.
Ink for 'distressing/edging' from stash

Enjoy!!
 

Sunday, 11 July 2010

Kenny K's Krafty Girlz Challenge

Call over to Kenny K's Challenge Blog for their very first challenge ... PASTEL. I'd purchased Kenny's digi images when they first came out and had coloured a couple of them. When I saw what the challenge was I thought - I can do that! I'd already got an image coloured in a way I thought would fit so here is yet another reason why I don't make many cards off my own bat *LOL*. 


Hopefully it's pastel enough for the challenge.  One of my first attempts at colouring with Promarkers.  Must practise more - *LOL*

Ingredients:
White hammered card blank
DCWV mat stack - Neutrals
Papermania Colossal paper pack - Pastel
Nesties, petite ovals - large and small, plain and scalloped.
Martha Stewart Lever Deep Edge Punch - Garden Trellis
Prima E-line flowers (I think)
Gems from stash.
Craftwork cards Card Candy
Image ... Kenny's Download Diva coloured with Promarkers.  No idea what colours used.


Enjoy!!
 

Monday, 26 October 2009

Colouring Workshop - again!

They say the Lord likes a trier so He must luurrve me and Greta 'cos we're very - sorry, that should be 'really' - trying ... LOLOL!! The number of times we've (oops!) I've had instruction in colouring you'd have thought we'd got it by now! I think I have got the pencil colouring, be it Prisma Colors or the UK equivilant, Coloursoft, but it didn't stop me doing another class at The Craft Barn yesterday, hoping to pick up a few more tips that I could work on. Unfortunately my watercolouring is still bad (that's probably an understatement), despite doing another class on that as well.


The morning class wasn't what we expected at all but it was thoroughly enjoyable because it was different! We learnt how to lay down a flat wash, a graduated wash and how to make a sunset background. Now, they could all be very useful but then they're more slap it on and watch it develop. We learnt how to deepen the colours with layers (not extra paint/ink added as I thought - lol!) and we had a go at colouring a traced, stamped image which was interesting although mine was a bit of a disaster however, not as much as the poppy which we won't talk about - LOL!


The afternoon was using Coloursoft pencils and Sansodor. I was hoping to pick up a few more tips on using these but the original tutor couldn't do the class so a substitute was bought in, in the shape of Stamping Caz - lol!! The first thing she did was admit that she had only used these pencils 3 times before but she gave a good demo for those that had never used them so needed to learn from scratch or have basic tips on how to proceed. I enjoyed the class, even if I didn't pick up anything extra on their use. We made a double slider card and a standard DL card using a couple of the Craft Barn's Kadoodle stamps (designed by Sandra Dry who should have been our tutor for this workshop) and a variety of DP. I finished the projects at home and went a bit overboard with my 'distressing'. It's very distressed - LOL! That's the fault of doing it under a side light instead of proper light. Mind you, I don't think it looks too bad ... ????


I did learn a couple of things from this class though. I don't like Coloursoft as much as Prisma Color. They are softer, both in the lead and in the colours and neither do I particularly like the effect of colouring round the edge and dragging the colour in - which can be done providing a very silky, smooth card is used. The slightest texture on the card and forget it! In that instance, colour the whole image lightly with a very pale colour (even if it's white) and build on top of that. I think I've got used to working on 'rough' card and colouring the whole image and now, what I was originally trying to achieve, no longer appeals. I've developed my own style and I've realised that I'm happy with it but I'm still open to trying and adapting anything else along the way. Just wish I could get a handle on watercolouring - lol!

Enjoy!!

Friday, 16 October 2009

Inside out & Cuttlebug owl!

Had a lovely day at the Craft Barn on Wednesday with a group of crafty friends - all arranged to meet up with one who had travelled down to the south from Scotland. Brilliant day, lots of laughs and a bit of crafting done. Probably not as much crafting as originally intended but reckon we all enjoyed what we did. A couple of cards in the morning, decorating the inside as well as the out and tips on the Cuttlebug in the afternoon until we were shown an owl! "We want to make that" was the cry so tutor had to go find suitable materials and make the owl we did - and what a cutie!


Owl made from Bazill Bling and coordinating colour for tummy. White and black card for eyes and bib and different shades of orange for feet and beak. Tummy embossed with Cuttlebug folder Tiny Bubbles to give texture. Head cut with the small Go Kreate Square Pointy #3 die, body from Classic Scalloped circle nestibility and all other shapes from relevant sized punches/nesties. Beak was hand cut. Cream organza ribbon for bow and buttons are Craftwork Cards Card Candy.


Robin & postbox card was stamped twice with Kadoodle stamp Postbox Robin. One image was coloured with Derwent Coloursoft pencils and Sansodor and the internal image just had the robin coloured. It doesn't show in photo but the postbox was glazed. Both stamped images were cut out using a Go Kreate die (see owl description)and both shapes had pale blue ink sponged around the edge. The same die was also used to cut the shape out of the insert to match the plainer stamped image. This card is still to be completely finished but there will be a verse/greeting plaque printed and cut out using a nestibility and a plaque for signatures.


Castle card was made using PaperArtsy stamps. The main castle is PaperArtsy Crowns & Castles 4 and the internal village was stamped several times using PaperArtsy Crowns & Castles 7. "Once upon a time" is from PaperArtsy Crowns & Castles 8. The 'extension' was embossed using Cuttlebug folder Tiny Bubbles.


Enjoy!!

Wednesday, 14 October 2009

Another challenge card.

This time it was a challenge on the imag-e-nation forum. It came just at the right time as our eldest grand-daughter's 13th birthday was on the horizon. I'd been playing and had already made a 'never-ending' card blank and had decided to make it her card but had no idea what to put on it, although I'd already chosen the backing papers. I wanted to keep it simple so the mechanics of the card took the limelight and then Val issued the challenge ..... butterflies! Didn't matter what shape, colour, occasion as long as the card had at least 2 butterflies on it so, my problem was solved. Grand-daughter's verdict (her birthday was 2 weeks ago but had to delay posting because of the challenge)? I quote ... "i loved it x .... it was amazing x .... thank you x ..... i really did love it x :d " I think she liked it *LOL* Now I reckon I'll be having to show her how to make it!

Click on any image to enlarge


Materials:
Base card - standard white card cut into 4 strips 6 inches by 3 inches and joined to make the neverending card base.
Backing papers - Papermania Sweet Nothings paper pack.
Embellishments - Squares cut from same card as base using nestibilities and sponged with ink while die still in place. (Tip: If using rub-ons sponge the ink on after using the rub-ons. They will not stick to the card once it's inked - *lol*)
Silver rub-ons, Papermania stickers, Anita's peeloffs and holographic, self-adhesive butterflies, some of which were stuck onto acetate to make 3D.
Not shown in photograph as they were added later - crystal gems on the 13 Today side, for an extra bit of bling!

Enjoy!!