Showing posts with label Sizzix. Show all posts

Thursday, 9 June 2011

Afternoon workshop ...

... with Alex Kamann, 3rd June.  White on White and they were stunning cards!

The first card was a small 4" x 4" one.  The card was embossed with a Sizzix embossing folder.  A strip of white card had a greeting stamped on a lower corner and then stuck to card base and trimmed to size. A plaque was cut from white Bazzill Bling (or similar) using the Spellbinders Labels Eighteen.  The flower was made from several layers of tissue paper cut with the Spellbinders Blossom 3, although any circle die/punch with a bit of shape to the edge would do.  Each layer was joined with a brad through the middle. Every layer was scrunched up then 'fluffed' out to make the flower.  Brad colour doesn't matter as it can't be seen.  A few leaves were punched and the flower and leaves were mounted onto the plaque which was then stuck to the card base.  Stickles glitter glue was dotted over the flower to lift it.


The second card.  This one was a 6" x 6" card.  A square, slightly smaller, was cut and embossed using a Sizzix embossing folder.  The edges were then distressed with Antique Linen from the Distressed Ink range. A plaque was cut using the Labels Eighteen set and the edges distressed as before.  A greeting was stamped in one corner of it, in the same ink so it all tied in.  

Using a slightly larger die from the Blossom 3 set, several layers of tissue paper were cut.  This time, before they were all put together, the edges of the shapes were lightly distressed and then they were all put together and 'scrunched' in the same way as the first flower.  A piece of vellum was stamped with a text background stamp using white Stazon and a couple of Martha Stewart butterflies punched from it.  Another piece of vellum was used to hand cut some leaf shapes and veins were embossed onto them.


The embossed square had a length of ribbon wrapped round it at the point where the embossing folder join was and then it was adhered to the card blank.  The label was attached using foam pads.  A foam pad was also used to attach the flower and then the leaves positioned and stuck with wet glue.  The butterflies were also attached with wet glue and, although the sample card didn't have them, I chose to add diamanté gems to lift them as the butterflies were a bit 'lost' against the textured background without.


I love these white on white cards although they're not the easiest things to photograph to show the detail involved.  I also love this flower.  It's so easy but so effective.

Managed to get instructions printed for the shoebox card and put into packs so they're now all done.  Just got to decide what I'm taking to our weekend and start getting it together.  Kindle, MP3 (perhaps), tools, and .... no idea!

Had a Groupon day yesterday. First I had a facial deal that was an experience!  Never had a facial like it before but for £14 it was exceptional value. Lasted 1½ hours and included a neck, shoulder and face massage - mind you, some of it seemed more of a slap around but it was very therapeutic. A young Chinese lady so think it was all based more on oriental methods than European.  Will I be going back?  You betchya! Even at the full £36 it would be well worth it.Thinking of trying her manicure, pedicure and one of her massages. If they're anywhere near close to what I've had by Balinese ladies she will be getting my repeat business.

The second one was the meal at The Brasserie in the Marina.  Paid £25 for a meal to the value of £52.  What I like about this Italian restaurant is that there's very little pasta on the menu. I had fillet steak medallions cooked with bacon and sliced parmesan with rocket garnish and seasonal veg, not that I had any veg as there was plenty on my plate without it - there being 2 steaks and 2 rashers and enough rocket and other leaf to make a small salad. Paul had veal cooked in some Italian way as his main and calimari as his starter (I had tiramisu for dessert, no starter). I tried his calimari but it's not something I've ever liked, no matter how many times I've tried it however ... this time I've got to say it was lovely. The best I've ever tried.  Beautiful meal and everything cooked to perfection.  We cabbed it there and back so were able to have a bottle of wine to round it all off and bonus, although pretty breezy and hence, chilly, it didn't rain, sleet, hail or snow - *lol* Lovely day all told.

Wednesday, 20 April 2011

Boy, it's hot, hot ...

... HOT!!!  Yesterday was hot but it's been even hotter today - or seemed it was to me.  Eldest son and his partner's youngest came today and, while he was here, he put together a lovely toy for me.  It's been residing, in it's box, in the shed for over a year but it's now usable - and use it I certainly will!


Kieran and Chloe, the eldest grandchildren arrived as well, so we had quite a family gathering.  Kieran brought his girlfriend and her little boy.  Scary and, not wanting to go there but, he could potentially be a step GREAT grandchild!  As I say, I do NOT want to go there - not yet, anyway :0{  I'm not old enough to be a great grandparent - pleeeeease!  Didn't think to get camera out while they were all here. Stupid 'cos photo opportunities with any of them are few and far between and now I regret not putting brain into gear and getting camera out as there might not be another opportunity for months.  Getting too many senior moments recently with brain not working until it's too late :0(

Final bit of shopping for holiday done and dusted.  Tried on another dress I'd seen last week and, although I loved the colour and it was pure silk, the fit was atrocious.  Bagged under the arms and over the bust.  Empire line dress but a smaller size wouldn't have fitted under the bust.  Really disappointed but it's saved me £100 *grin*

Here's the last project from Greta's playday and it was my offering.  This one was very much a fly by the pants project.  I'd bought ordered (Paul paid for it as part of my Christmas present) the die at a very, very good price but had never used it.  I cut all the elements needed and it was a 'follow the directions' make for us all for the first time.  Think we all discovered where we could improve if ever made again but strangely, although I took the die with me, nobody rushed to cut the parts needed to make another - *LOL*  The die used is a Sizzix Bigz XL called Pop Up Snowman (I think).  I used it with my CuttleBug using extended plates but they aren't totally necessary as you have to be quite selective with cutting the pieces.  There are some elements that you need more than one of but there's only one on the die.  I don't actually dislike it and may make more, especially now I know where it could be improved.  I finished the card at home on Sunday ...


 I entered this one into the forum's April inspirational challenge as well ... to include a button.

Thanks for dropping by ....
.

Thursday, 4 November 2010

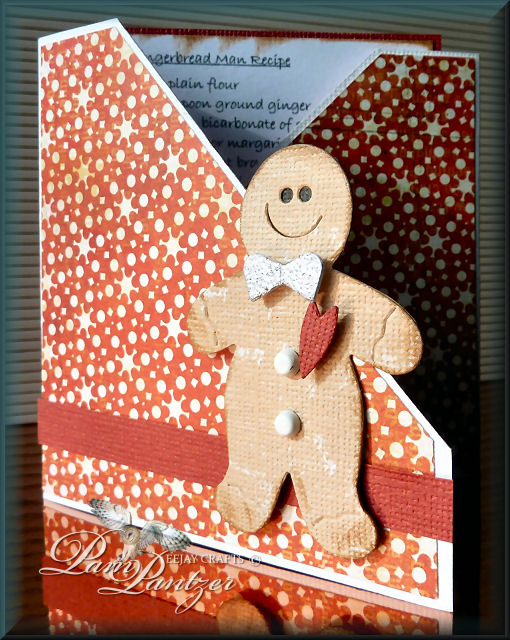
Christmas with Sizzix Workshop

Thursday 22nd October - afternoon at the Glitterpot with Jackie Huckstepp.

Using Sizzix dies in the afternoon, again with a selection of DP.


Ingredients:
Sizzix Original dies - Reindeer #2 & Gingerbread Man #3
DP - Basic Grey
Bazill card
Gems, paint (for icing sugar), gems, brads, bell & ribbon.
Large scalloped circle punch or nestie.

Enjoy!!
 

Friday, 11 December 2009

SE imag-e-nationer's Christmas meet #2

5th December, Southwater, Horsham.
Both of the following cards were projects given by Jennie, the organiser of the meet. I started both during the afternoon but ran out of steam so took them home and finished them.

The Christmas tree card was made by cutting the outer frames, layering them onto the base card and then folding 4 different sized squares of paper and adhering them in position. Finished with a Craftwork card greeting and a jewel.
Details (by request and with thanks to Jennie and Lynn):
Card blank 14.5 cm square
Backing frame to tone (mine's silver)- 13.5cm outside, 9cm inside but it should have been 9.5cm hence I have a wider internal border than intended but I prepared it from email instructions not those given on the day. Don't think it really matters and I quite like the wider inner border.
Backing frame (to match tree) - 13 cm outside, 10 cm inside.
Four squares (to match backing frame) 7.5 x 7.5cm, 6.5 x 6.5cm, 5.5 x 5.5cm, 4.5 x 4.5cm
Instructions on how to fold the squares can be found here.


Update 8th Jan 2010: - I've now made one of these cards using a 12cm square card blank.
Backing frame to tone: 11.5cm square outside, 8.5cm square inside.
Backing frame (to match tree): 11cm outside, 9cm inside
4 squares (to match backing frame): 6, 5, 4 and 3cms square folded as before)

The star card was made by covering a square card with DP and then cutting a section of the card away, filling the gap, in this instance, with stars cut out of metallic card using a Sizzix Bigz die, layering some with stars cut from the DP. As the back of the metallic card is a browny grey - not white - I decided to back the stars with more DP so that when the card is opened the theme follows through. It also had the added advantage of strengthening the whole card. It took me a while to get my head around this one and get the layout of the stars to work but I'm really pleased with the end result. Might make this one again .... especially seeing the finished results that others did by really thinking outside the box - lol!


Enjoy!!

Wednesday, 9 December 2009

Cut Flowers - Workshop

Jackie Huckstep, 27th November at The Glitterpot.
Afternoon session - 2 cards.
Floral die cut birthday cards.

Daisy flowers on pink & brown card ... Sizzlit 3 Die set, Hello Kitty - Butterfly & Flowers, Set #2. Card and aperture cut from a template designed and supplied by Jackie.

Green card cut using Sizzix Movers & Shapers - Kit #3 card, Horizontal note.
The flower was from the same set as the daisy on the pink and brown card.


Enjoy!!

Tuesday, 8 December 2009

A Christmas to Die For - Workshop

Jackie Huckstep, 27th November at The Glitterpot.
Morning session - 3 cards.

Die-cut Christmas cards combining embossing folders and Sizzix dies .... Sizzlit - Tree, Christmas #4, Sizzix Bigz - Holly & Berries, Cuttlebug embossing folders - Season's Greetings (cut up and elements used on each card) and Snowflakes.


Enjoy!!