Saturday, 14 June 2008

TUTORIAL - Floral Punch Craft - Anenomes

I've had several queries asking me how the anenome flower is made and it is one of the flowers I had intended showing at the crafty meet that some Southern imag-e-nation forum members had recently. Time, unfortunately, ran out so nobody was able to make any of the flowers I'd hoped to show them, although I managed to do a quick demo. I promised I would try to cobble together a tutorial so here is the first one! This is such an easy, peasy, lemon squeezy flower but it is sooooooo effective. Takes no time to make so is ideal for a quick, but special card ........


TUTORIAL (Click on any image to enlarge)
(Floral Punch Craft tools can be found at Centagraph, who carry the full range)

Tools & requirements:
~ Moulding mat
~ Scissors
~ Tweezers
~ Quilling tool
~ DEET (Double Ended Etching Tool)
~ Shape mate
~ PVA glue (fine tip applicator)
~ Black (or dark brown) Chalks
~ EK Success Papershaper Retro Flower or X-Cut Flower punch
~ Coloured paper for petals and black paper for flower centre.


METHOD:

Step 1: Using either punch but the same one each time (I've used the X-cut one here), punch 2 shapes from your choice of coloured paper for the flower petals
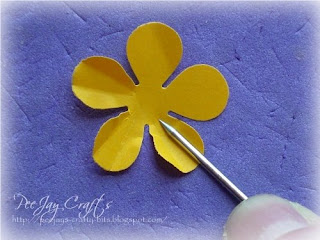
Step 2: Place the punched shapes on the moulding mat (dense foam mat). Take the DEET tool (or a pokey tool, darning needle or something similar with a point) and, keeping the tool as flat as possible, score 2 lines on each petal from the base to the edge, dividing the petal into 3 sections.


The punched shapes should look like this ....
.
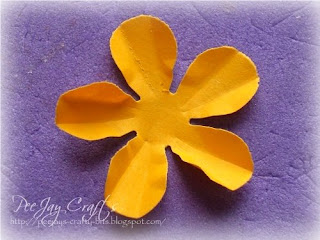
Step 3: Turn the shapes over and, using the DEET tool (or your alternative), score 3 lines on each petal, from the base to the edge. This time you need to score one line between the 2 lines previously scored and then one each side of them.


The punched shapes should now look like this .....


Step 4: Turn the punched shapes over. Take the shape mate (large embossing ball) and, using light pressure make small, slow, circular motions in the centre of the punched shapes until they 'cup' very slightly.


Step 5: Using black (or dark brown) chalks, lightly chalk from the centre of the punched shape to the edge, getting lighter as you near the edge. The ridges will take the chalk, rather than the 'valleys'.


Step 6: Put a small dot of wet glue in the centre of one punched shape and place the other over the top, off-setting the petals, and holding gently in place until secure.

The shapes should now be looking like this .....

Step 7: Take a strip of black paper, approximately 8 inches long by ¼ inch deep (I usually trim the short side of an A4 sheet of paper using a paper trimmer) and fold it in half, twice.
If using the Papershaper Retro Flower punch the paper strip needs to be a little deeper as the punch is slightly larger than the X-cut punch.


Step 8: With your scissors snip along the edge, cutting to near the bottom of the strip to create a fringe but leaving a small (tiny) border at the bottom.


Step 9: Unfold the strip to show the fringe, full length and, with the exception of the very ends, dot tiny spots of glue at approximately 1 inch intervals along the uncut border.


Step 10: Place one end of the strip into the quilling tool (or hold with tweezers if you prefer) and roll to form a tight, fringed coil.


Step 11: Place a small dot of glue at very end of strip and use this to fasten the coil. Hold until glue adheres (image far right)


Step 12: Using your fingers, pokey tool, tweezers or the flat end of your DEET tool (which is my preference), if you have one - 'fluff' out the cut fringe of the coil.


Step 13: Put a good 'blob' of glue in the centre of your punched shapes and position the 'fluffed' coil in the centre. Put light pressure on and hold until the glue adheres.


Step 14: Flower ......... FINISHED!!


The picture, below left, is to show the size difference between the 2 punches - EK Success Papershaper Retro Flower to the left and the X-cut Flower punch to the right. The picture on the right shows 3 flowers made from irridescent vellum. There is no chalking on these flowers.


To see my all-time favourite FPC card I made using this flower take a look here

Enjoy!!

Thursday, 12 June 2008

Doh!!

Still can't make up my mind if there's 2 or 3 but I still think there's 3 - there's definitely 2 - lol!! I spent a while "leaning on a lamp post" but not on a corner of a street ......... up the road from my place, with my camera and watching, waiting for what I thought was the third one to move. It was definitely a case of now you see me, now you don't but it could be that what I thought was a third, was just a lump of nest as it seemed to disappear when one went and sat near it. There are 2 out on the roof with Mum(?) and there's the 'lump' I think is the third (or not) near the apex of the roof.

Just 40 minutes after taking the photo above this is what came down - and I missed the hailstones ....... (what did we do before digital cameras, eh? - LOL!)

Thanks for dropping by .....

Wednesday, 11 June 2008

He got it......... yessss!

The part-time job that grandson had an interview for, that is. Not bad considering it's the first interview he's had for a job. He's applied for a couple of jobs when he turned 16 but didn't get that far. We thought it was because he only wanted weekend work and where he applied wanted people who could be more flexible with hours. This time they were actively looking for weekend workers so he's in! For a while he can only do 3.5 hours a day as he's still, officially, at school. Although he doesn't have to go into school any more - he's still not officially finished. He has his induction session tomorrow and starts work this weekend. He's going to keep his paper round on as well, for now.

It seems odd 'cos I started a Saturday job when I was 15 and worked full-time through school holidays. Mind you, I've just realised, the normal school leaving age at that time was 15 - doh!! I tend to forget that because the leaving age of the school I went to was 16, even then. It was a grammar school and you had the privilege of having to stay on a year longer! They preferred you didn't leave however, even at 16. They preferred that you stayed on, went through 6th form and then went to uni. Not that I did either (one of the few in the 5th year that didn't)! I did go to college after my 'O' levels though!! OK, so I'm now showing my age .... 'O' levels? What are they??? - LOL!!

Thanks for dropping by .....

TUTORIAL - Double-fold Card with Fold-back Corners

A quick and easy one which is very versatile and can be made any size you like within the confines of the size of the piece of card used. Make a small version and use it as a topper, closed by pretty ribbon and bow. Make a larger version and make a card like this one ......


TUTORIAL (click on any image to enlarge)


Tools & Requirements:

-Ruler
-Pencil
-Bone folder
-Embossing ball tool
-Piece of card. (Length should be 3x the height).
If you prefer you can use a score board


METHOD:
Step 1: Measure and mark your piece of card to divide into 3 equal sections - marking both top and bottom of longest length. The card I've used is 4inches high by 12 inches long (a third of a 12x12 sheet of Bazzill) so I measured at 4inches and 8inches.


Step 2: Score between the marks, top to bottom


Step 3: Fold and set crease with a bone folder.


Step 4: Next you need to score from corner to corner on the outside sections. It doesn't matter which way you score, from top right to bottom left or from top left to bottom right, as long as you score in the same direction on both sides.


Step 5: Crease and fold on these scorelines using your bone folder for a sharp edge


Step 6: Fold the 2 sides over the centre panel.

.
Step 7: Card FINISHED!!

There's a few things I've found having made a couple of these cards now.............

~ If you're using a card that's textured one side and not the other - like Bazzill - and you're going to cover the front with backing paper, then my preference is to have the texture as the card inner. That's the part that will be seen when the card is opened. To get a nice finish to the inside of the card, in this instance, I do my scoring on the textured side of the card and then the neatest part of the crease will be the visible part.

~ If you're using 12x12 to cut your card from you can get 3 - 4x4 inch cards or, for toppers, 12 - 2x2 inch or 5 - 3x3 inch and any combination inbetween - lol!!. Just remember that the length always needs to be 3 times the height of the card.

~ For balance, and so they stand securely, if you're going to use as a card and not a topper, it's best to embellish the bottom section, otherwise the card is top-heavy.

~ If you don't want the 'flappy' bits, try cutting them off, or even sticking them down. If not both, you could try cutting or sticking the top one.


The card to the right was scored, on the diagonal, from top right to bottom left.

The card to the left was scored, on the diagonal, from top left to bottom right.

Basically, just play. This is a very versatile fold so .......

Enjoy!!

There's definitely ...

... TWO!! There were 2 little grey heads bobbing over the roof apex this morning. There could still be 3 but it's definitely 2 - lol!! Just hope I manage to get a photo of this years brood before they get too big and disappear. We will be doing something to deter them from nesting there again when they've gone!

Reckon we do our share for the wildlife in this area - we've 2 starling family's that never leave us and several sparrows that like the roof space above my craft room (???? eh, where????) velux window - visible in a photo below. Not had, or at least not seen, the foxes this year. Perhaps they didn't like the stuff I was feeding them last year, to rid them of the mange, or perhaps it didn't help and they've died. I don't know, but considering we had 3 of 'em, who used to enjoy sunbathing, there's been no sightings at all this year. :o((

Thanks for dropping by .....

Tuesday, 10 June 2008

On guard!

Well, at least one is. I still haven't managed to make out exactly how many little ones there are but I've seen little bundles toddling around the roof. Just not got a close enough view to make them out clearly or to get a photo ........ yet!
Mum/Dad was standing on roof watching over the little ones (they're generally tucked down in the corner between the chimney and the roof to the left) when I was on my way out this afternoon - and resting, but watchful, when I came home - bless!

Bless, for the moment because they've not started their dive-bombing campaign yet - LOL!!

Thanks for dropping by .....

I'm feeling ...

... OLD!!
My grandson had his last day at school yesterday. He's now all 'growed up' - allegedly - LOL!! He has an interview for a part-time 'proper' job this afternoon (as opposed to paper round job). Part-time because he's hoping to go to college in the autumn. He's already done 2 years on a basic motor mechanics course as part of his options and he's actually NVQ Level 1 qualified - changing tyres, exhausts etc. He's been working one day a week at a local garage since the college course finished (arranged by the school), free and gratis, for work experience and also so he had no excuse to bunk off school. "Well, I didn't have any lessons to go to!" .......... type of excuse - lol!. Unfortunately, although he's qualified and has been doing basic work at the garage they don't work weekends so can't give him a job. Would you believe, the one place that could employ him at weekends (Kwik-Fit) won't, because ........ he's not 18. So, he's qualified for the job but they won't give him a job because he's only 16 :o(( Just where is the encouragement for youngsters today?

Eldest grand-daughter (grandson's sister) is coming up to finishing at primary level and, in September, will be moving to the secondary school that grandson has just left. She's now back from her trip to the Isle of Wight last week and loved every minute of it. They went to a place called Little Canada and I don't think I've heard of a kiddie who's been there that hasn't liked it. She had a go at everything except the stuff that involved starting from a height - like abseiling. She tried rock climbing and the Jacobs ladder and was OK until she realised how high she'd got then she had to stop but, at least she gave it a go. Everything else she did and got 'wet, loads!' Such a great way to mark the last year of primary education.

Thanks for dropping by .....

Monday, 9 June 2008

TUTORIAL - Reverse Iris Folding with 3D Decoupage ......

......or something! There was a card posted on the imag-e-nation forum a week or so ago by JanR, several people have been trying to work out how it was done. Jan kindly posted instructions but after a craft day with friends from the forum last Thursday, where Jan took us through this technique I have, hopefully, put together a tutorial to show exactly how it's done and no - it's not a reverse twisted pyramid/pyramage in any way and there's no real short-cut to get the effect right. Sorry folks but it's just down to some good, old-fashioned crafting - lol!!


TUTORIAL (Click on any image to enlarge for a clearer view)
Tools & Requirements:
- Scissors and/or craft knife
- Cutting mat Ruler
- Pencil or pokey tool (paper pricking)
- Double sided tape/tape runner
- Optional, Embossing ball tool, small-ish
- 4 images the same, on paper - choose carefully
- Aperture card of correct size for picture
- Foam pads or silicone (left off photo)


METHOD:
Step 1: Run double-sided tape or your tape runner around the aperture of the card on the wrong side.


Step 2: Centralize a full image in the aperture, from the front, and stick down.

Step 3: Decide which part of the image you wish to decoupage, making sure there will be enough of a border to fold back allowing for approx 1cm at widest part. Images that have a reasonably centralised group will probably work best. Roughly cut out that part of the image and place to one side.


Step 4: Start at one corner and measure and mark 1cm from that corner, on your image, with your pencil or pokey tool. You can make this mark 1 or 2mm's into the image (as I did with poppy card) or mark it right on the edge (as with this daisy card). Which corner you start at doesn't matter. I used the right hand corners on the poppy card but the left hand corners on this daisy one but, the equivilant corner on each side must be used.


Step 5: Turn the card and do the same from the next corner.

Step 6: Continue to turn the card and mark in the same way on each side. You should now have a mark at 1cm from one corner on each side of the rectangle.

Step 7: With your craft knife cut from the pencil/pokey tool mark into the centre of the image, at an angle.


Step 8: Once all 4 cuts have been made you need to fold from one mark to the next, front to back to the inside of the card. I found it easier to use a fine-ish ball tool and score a line but you could turn the image over and use a ruler to fold over after lining up the ruler. You are looking for a really crisp fold so it may not hurt to run a bone folder or similar down the folds.


Step 9: Trim off at back. I flattened the image out and trimmed with a craft knife but you could use scissors (I don't do scissors - lol!) and stick down to neaten. (See front image above)


Step 10: Run your tape runner or double sided around the new aperture.

Step 11: Line up the next full image, centralising but, more importantly, lining up the new image with the part of image showing from previous layer.

Step 12: Once again, decide which part you are cutting to decoupage this time, allowing for the fact that you will need a slightly larger margin this time to fold. You should be cutting less in any case, as is the way with 3D decoupage. Cut out roughly, as before, and put to one side


Step 13: Now take your ruler and pencil or pokey tool and, using the same corners as before measure and mark 2cms from those corners. Try to keep the same aspect for these marks as you did last time - ie. if you marked and cut from the edge do the same again but if you marked in a mm or so, then do so again.


Step 14: When all relevant corners are marked, cut from the marks to the centre as before.


Step 15: Fold from mark to mark as previously described, trim and stick.


Step 16: Repeat all the steps above, starting with the 3rd full image, centralising and matching image, selecting part to decoupage (allowing for the fold that has to be made), roughly cutting and putting to one side. On this layer you should measure 3cms from the relevant corners. Fold, trim & stick.


Step 17: Take the final full image, centralise and match the image and stick to the back of the last 'made' aperture. This is the image that you will decoupage onto.


Step 18: Cover the back of your work to neaten it up using toning card, paper or the flap of a double-fold aperture card (as I used).

Step 19: Cut the pieces you have put to one side for your 3D decoupage and layer them up using foam pads or silicone glue, whichever is your preference.


Step 20: The finished card ........... The poppy has only 3 layers in total as I made a mistake, but it shows that it wasn't a disaster and is just as effective. Silicone was used to layer the daisy's, foam pads for the poppies.

 
Enjoy!!