Sunday, 28 June 2009

TUTORIAL - Creating a Watermark in PSP9.

How about this then! Here's little old me, with very limited knowledge of PSP and I'm doing a tutorial on it *LOL*

I've no idea if this is the right way of doing it but it's what I've found by playing and with snippets of info I've picked up/retained from others (mentioned in earlier posts). I'm sure there must be an easier - and quicker - way but this works for me so hope it does for every one else. The tutorial will take you through how to make the example on the right (hopefully) but goes one step further in that it also tells you how to add transparency to it so that it really does become a 'watermark'. I left the transparency off of this example to show the effect of layering text, in more detail. I would also say that the text is much larger than I would do in relation to the size of the picture but this is deliberate for the purposes of the tutorial.


TUTORIAL - PEEJAY’S VERSION OF CREATING A WATERMARK IN PSP9
Click on any image for a larger view
I do my name with an enlarged initial letter and smaller lower case ones and I also stagger the words so I’ll take you through the procedure that I do. If you want your text to be the same size then you can do it in one text box in one go, or 2 or more if you want to stagger the words …

1. Open a new, transparent sheet. I use a large one because you can crop when finished so I think it's better to start big and crop, than not big enough and have to start over if you run out of room! I usually have a 7x5 inch landscape to start with.


2. Select the Text tool and click on the sheet. From the text toolbar I have ‘Create as’ on Floating and stroke width at 0.0. Everything else was just as it opened up for me – I didn’t change anything (hope tool bar is clear in piccie – zoom view if not).


3. Select the colour for your text from the Materials toolbar. I eventually chose white but I didn’t while playing becaeus I found it difficult to see what I was doing so I played with a colour until I was happy with the method and ready to try one for real.


4. In Text box type the first letter – P in my case – highlight it and choose the font you want from the font box. Keep it highlighted and choose the size. The size you choose for the initial letter really depends on the font you choose as some need a larger size than others so it’s trial and error. Check the ‘Remember text’ box – just in case you decide you don’t like what you’ve just done when you see it properly. It makes it easier to get it back, although you don’t have to do it. Click ‘Apply’ There should now be a dotted line around the letter. This will allow you to move it around but first –


5. Go to Effects, 3D Effects, and Drop Shadow. Play with the shadow effect there until you’re happy with it (make sure that ‘shadow on new layer’ is not checked) and click OK. Now position this letter on the sheet.


6. Click on the sheet again and click OK if you get a box come up that says the selection must be defloated. Now highlight the letter in the text box if you checked ‘Remember Text’ and overtype in the rest of your name – ‘am’ in my case.


7. Highlight the new text, select your font (I keep the same at this stage), select the size (I usually choose a smaller number than I used for the initial letter but that is your choice), and again make sure that you’ve checked the ‘Remember Text’ box if you want to and click ‘Apply’. Follow the procedure in point 5.


8. Continue in same way for your Surname if using but if not you can continue adding any text and positioning it until you’re happy with it. If you want to layer any lettering you have to do it before you ‘defloat’ and you do it by right clicking on the highlighted ‘Floating Selection’ in the Layers toolbox, going to ‘Arrange’ and selecting ‘Send to Bottom’ or ‘Bring to Top’


9. You can add a copyright logo © by copying and pasting one from Word. I’ve not found a way of typing one in the text box. Doesn’t seem to like it but it will allow you to paste it in. Treat it in exactly the same way or leave the drop shadow off. Choice is yours, as ever.
***Update: To type a © in the text box press Alt and type 0169 from the numeric keypad on the right of your main keyboard. If you don't have one it won't work and you need to copy/paste as mentioned. Neither does it work for all fonts as some don't recognise the symbol.

10. Now, if you want to add an image you need one that is a .png image. I’ve made my own by finding an image, removing the background and saving it to my PC. Open the image in PSP, Edit and Copy then ‘Paste as New Selection’ onto the sheet that has your text on. Now you can move it around to position it to where you want it and ‘Send to Bottom’ or ‘Bring to Top’ if you want to, as per instruction #8. Basically play until you’re happy with the positioning!

11. At this stage you can fade the picture a little if you want to, especially if the text is laying over it so that the text is more prominent. You need to right click on highlighted Floating Selection in the Layers toolbox and select Promote Selection to a Layer.


12. You will note that in the Layers toolbox there are 2 columns. You’re now looking at the right hand column which has a slider bar on it. This will fade the image (make it more transparent). If I’m fading to bring the text more to the fore I’ve been doing it to around 80%.
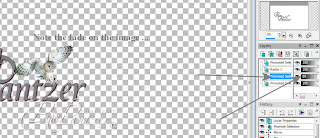

13. That is basically your watermark done. You now have to bring it all together as an image so you need to click on the Layers drop down, select Merge and click on Merge Visible. You will note that there is now just one layer in the Layers toolbox which says ‘Merged’.


14. At this point crop the watermark as close as possible.


15. I usually save it now, before I start adding transparency but you don’t have to if you don’t want to …. You’re saving as a Tube.

16. To save your creation as a Tube click on File, Export, Picture Tube and give it a name in the box that comes up. Click OK. That’s your original watermark saved.


17. You can fade the watermark (add transparency) by following instruction #12 (remember that there is now only one layer to work from). I usually do 2 – one to 75% (top) and one to 50% (bottom), saving each as individual tubes. It then gives me a choice as to what I use on what piccies and also gives you a choice as to how prominent you want your watermark to be on your picturess.

  
USING THE TUBES TO ADD AS WATERMARKS
I always resize my photos for my blog or posting anywhere else to around 650 pixels on the largest side. You will find that the full size of watermark is probably too big but again, it’s trial and error to what you like. To use it in the first place …

A. Open an image you want to use and resize.

B. Find the Picture Tube Tool on the left hand menu and click on it. A new toolbar will open at top of picture window


C. Click on the drop down and find your watermark, select it. Your cursor will look like a funny stamp thing and all you do is click on your photo roughly in the area you want your watermark. If you don’t like it ‘undo’ and try again. It’s a play thing!


D. It’s very likely that the watermark is going to be far too big but you can adjust the size of it by changing the ‘Scale’. Depending on how big your original watermark is you may need to take it down to 20 or less – again, it’s playtime!


I've put 3 watermarks on the image above (well, 4 really but the very bottom one isn't part of this tutorial *lol*). A is the full watermark, saved first. B is at 75% transparency and C is 50% transparency. You should also note that these watermarks are only 20% of their original size so the base one is really big! You may want to dramatically reduce the size of the original but I wanted to do it big for the tutorial. I prefer to have a large base one available (although not this big *LOL*) in case I want to watermark a large photo and just reduce the size for resized photo's.

Well, think that’s about it, in as much detail as I can do and hope I haven’t missed anything. Any questions then please ask in the comments and I will answer as best I can, if I can. There are a lot of stages to producing this watermark (less if you keep same sized font and don't stagger text) and I’m sure there must be easier ways of doing it but it’s what I’ve come up with, with my limited PSP9 knowledge. It isn't difficult though, once you get the hang of it and, as with most things, the more you do the quicker it becomes. Whether this tutorial will work for other versions I have no idea …

Enjoy!!


UPDATE: These instructions have been used successfully, I'm informed, in PSP12 so guess the basis is the same for all versions, once you find the tools!

Woo Hoo! ...

... our squirrel is back but my camera's gone awol. Well, eldest and grandson have borrowed it for a few days! Squirrel has not just opened the feeder this time - he's taken the top off completely. Need to go on a feeder top hunt to find it and see if it can be replaced!

Thanks for dropping by .....

Saturday, 27 June 2009

A rare sighting ...

... of more wildlife - the eldest grandchild - lol!! What's even rarer are photo's of him.

Came to help his Dad clean a very not-dirty car 'cos they're off to some car show tomorrow and beloved red thing is 'on a stand'??? They're going to Brands Hatch with the local Scooby Owners Club so I guess they're going to the Modified Live Summertime Special event.

Oh no ... not the camera, again!


If I put my head down she might give up!


OK, if I must then perhaps she'll go away! (huh, some chance!)


If you want a natural piccie you go - through the square window - so he doesn't know it's being taken - *hehe*


... and when he doesn't know you're watching he does smile ... sometimes *LOL*

Point of interest - and I'm gonna be such a girl now *lol* - under the red sticky up thing on the rear of the red box, protecting the main body of the box is ........ black, self adhesive Funky Foam bought from Crawley Hobbycraft! Why? 'Cos this giant, red sticky up thing is not what came on red box when first bought but was bought second-hand (and silver grey) and the 'gaskets' weren't complete or intact. Gaskets made out of a black foam stuff which was sticky both sides. Eldest didn't know how to get replacements but as soon as I saw what it was and what they were I just knew that Funky Foam, made sticky with some form of DST would do the job. Took eldest on shopping trip to Hobbycraft, found a sticky Funky Foam (bo-nus!), took home, traced round most complete rubbish gasket, ét voila ..... replacement gaskets for the job. Only one side sticky though but pleased eldest 'cos it meant no sticky on body of red box should new red sticky up thing ever need replacing. Total cost - less than a quid and a little bit of time. After, he thought he could have had the foam in red, instead of black - which is what I'd suggested and he'd dismissed at the time ..... men!

Thanks for dropping by .....

Friday, 26 June 2009

Our visitor ...

... yesterday wasn't a 'baby' dragonfly after all. Thanks to Gill for suggesting a Google ... and her name for it ... I've found out that it was actually a damselfly, probably a common blue (has to be common 'cos we can't have anything rare *LOL*). Anyway, that explains why it was tiny 'cos damselflies are smaller than dragonflies. They also have their wings folded against their body when at rest whereas dragonflies hold them at right angles. Had it been a dragonfly, as I thought it was, I would have stood a good chance of a piccie with its wings open.

Glad to have got the right info and .... why didn't I think of Googling in the first place. It's my second home - *hehe!*

Thanks for dropping by .....

And another one!

An image for a watermark that I've made in PSP. I shall probably be in danger of getting boring with this now I've sort of sussed out how to do it. Not sure what I'm doing is right but it seems to be working ... or at least ... I think it is *LOL*

Still on similar lines but I like the fact that the PeeJay Crafts and my names, christian and surname, can share the initial so both can be used and it's kept compact. I also like that I can bring my love of owls into it but I shall be trying other images. You never know, I might find something that I like more! Not likely but there's always a chance *hehe*


The top one is full strength and the bottom has been adjusted to 50% transparency


Enjoy!!

OMG! Michael Jackson ...

... is dead! Early afternoon (USA time) on 25th June. Unbelievable! It was being reported last night, before I went to bed, that he had died but although from pretty good sources, it hadn't been confirmed. It has now. Can't believe it. Despite all of his success and his money he was a very troubled soul which just goes to show that fame isn't all it's cracked up to be for some people. Horrendous childhood left him with real problems and I, for one, have had nothing but sympathy for him over the last few years of his short life, whilst never condoning some of his behaviour. An amazing talent and what a showman.

R.I.P. Michael Jackson because now you can ....
August 29th, 1958 - June 25th 2009

... not his best known but selected more for the pictures ...


... and he joined an angel who also sadly died yesterday - a Charlie's Angel, Farah Fawcett, who sadly lost her very dignified battle with cancer.

Thanks for dropping by .....

Thursday, 25 June 2009

Craft - of a different sort.

It's still crafting though! I had a quick lesson on PSP9 at our Crafter's House Party on how to make a watermark but, most of it I forgot within half an hour however, the 'playing' was still on my laptop to give me a clue and a quick email to Joanie for some advice helped as well. It's taken me a few hours, on and off ... mmmmmmmm, more like days *lol* .... of playing but I've done one! OK, it's very much on the lines of the lovely owl that Toni made me a while back and that I've been using for some time now but, this one I made all by myself so I'm really chuffed! Now I've got the PSP bug, well, temporarily at least, I just might need to see what else I can come up with! Here's my new 'watermark' in all it's glory ....


Enjoy!!

We had ...

... a visitor to our patio today.

When eldest son moved back home last year he also moved his garden pond in as well. It's a preformed one which never actually found it's way into the ground but did find itself full of fish and it now sits in the corner of our patio. Today, hubby was out searching for the fish - there's a lot of suspended algae in the water at the moment so they're difficult to see - and called out to me to tell me that there was a dragonfly hovering around. Me thinking, 'dragonfly' - aka cranefly - decided it was a bit early in year for them really but didn't want to know 'cos I can't stand 'em! Then I heard him talking to this 'dragonfly' and him telling me it's a baby. Decided that he'd finally lost the plot but found my camera and went out to see exactly what he was talking to, and about and, there it was ....... a very pretty, 'proper' little dragonfly and reckon he was right. Think it must have been a youngster as it was no more than an inch long.

It kept flitting about but it settled a couple of times, long enough for me to get some photo's (difficult 'cos it was so small but macro worked a treat). Couldn't get one with wings open though but hey! don't think these photos are bad and what a welcome visitor it was. Need to keep an eye open outside a bit more methinks.


Have to say it's an improvement on nesting gulls and mangey foxes though and it's obviously decided that we're not going to be totally free of wildlife this year, although by the look of the hydrangea leaves in the 2nd photo there's a few slimey wildlife been having a bit of a feast - *LOL*

It's been quiet on the Dad front these past couple of days so that's good news ... or is it? I'll find out tomorrow ...

Not seeing too much of eldest at moment either. He's found himself a new female friend and very nice she is too! It's early days, new and exciting so he's out more than he's home. At least he's happy, for now, so can't ask any more than that for him. It's been a good while since he's been really happy although there's been a marked change since he came back home.

Thanks for dropping by .....

Wednesday, 24 June 2009

Medallions/Frames

Made with EK Success Corner Adorner punches. One off the list from the House Party. I made one on our weekend and have tried some of my other Corner Adorner's since I've been home. The results are shown here and the punches used were -
A) Square Steps. B) Wrought Iron. C) Bubbles and D)Basket Weave.
I tried Iron Eagle as well but that one didn't work at all well - *lol*


The method for this is very easy and any corner punch that the guides can be removed from can, potentially, be used. Any design is worth trying. Some will work - as with these - and some won't - as with Iron Eagle.

A video tutorial on 'how to' can be found on the Amazing Paper Grace blog here and, how about trying a rectangle? I've yet to try that but I shall be following Becca's tutorial here. Just wish I had an inch of Becca's talent *LOL*

Enjoy!!

Tuesday, 23 June 2009

Inspirational cards!

A selection of beautiful cards received from some of the House Party guests. Truly inspirational and a big thank you for each and every one of them. Bit annoyed 'cos I've noticed that one seems to have had something spilt on it after I received it (not by me, I hasten to add) and I only noticed it when I was sorting through the photographs. Just wish, whoever had done it (and let me take an educated guess - mmmmmm, that'll be OH then!) had said but it's still a beautiful card none-the-less. These, together with the Glitterpot vouchers that were a gift from everyone are, and will be, very much appreciated and good use will be made of the vouchers - *LOL*


Enjoy!!

Yet another ...

... phone call, yet another fall! This time he was getting out of bed on his own - and fell, hitting his head! Seems he can't stand without falling and nobody has any idea why. Paramedics were called again and yet again he refused to go to hospital so a doctor is going to have to check him out there. There's got to be a reason why this has started to happen but without him going to hospital to have tests it's unlikely we'll get to find the reason which means it's likely to continue. I know I've said it before but the change in my Dad, in such a short space of time, really is unbelieveable and a complete worry. Where he did nearly everything for himself (with a bit of support) and was mobile, before he moved, he's gone to being able to do nothing and he's not yet been moved a month ....

Took a few photos of some of the plants in the garden while I was wandering yesterday. I know a couple are probably weeds that are growing in a planter on the patio but - on the premise that a weed is a plant growing where you don't want it and these were quite pretty, I'm happy to have these 'weeds' growing in my planter so that makes 'em plants as far as I'm concerned - *LOL*

Cape Fuschia
This particular plant decided to plant itself where it is (it used to be a banana plant - *lol*) but the original came from Mum's garden by way of one sprig pulled from the ground. It is a prolific spreading plant which is why I've grown it in a planter but it's still spread itself anyway - into this 2nd planter that's some 10 feet away ... ish!


One of the probable weeds that I'm happy to let grow.


The other probable weed - *lol*


A beautiful climber - name unknown - which is in my neighbour's garden but overhangs into ours and very welcome!

Hebe
now in full flower, in central bed.


Euphorbia
also in central bed and seems to be on it's 2nd flush of 'flowers'.

I missed the escalonia in flower but I'm hoping that it will flower again some time. There are other varieties of hebe that are in bud but it doesn't look as though they will come into full bloom for a while yet as they are still tight. It's great to know that there will be more blossom and, although the border is completely evergreen, it's good that there is colour in it as well. Can't wait to see it really start to mature and fill out. I'm just so pleased with the progress this far considering, apart from planting it, I've done nothing .... not even watered it!

Last week I happened to look over my next door neighbour's fence and found they were allowing a poppy bed to grow - oriental type - and the plants had huge buds on them! Now, knowing what beautiful flowers we used to have from those that grew wild in our garden (seeded by wildlife) before it was done, the wonderful colours and the huge double blooms, I was hoping to get some piccies when bud broke, for use in my crafting. Yesterday I went to look and, sure enough, buds had broken but ..... they're all red poppies! Beautiful poppies most certainly but all red and not a double bloom amongst 'em! There's more to break bud but don't reckon there'll be any different. Took photo's anyway and was trying to get a bumble bee that was visiting one flower but neighbour saw me and came out for a chat (think he more worried about what I was up to hanging over fence!) and I never got said bumble bee!


Thanks for dropping by .....

Monday, 22 June 2009

Crafter's House Party ...

... instalment number 7 and the last .... the challenge card one!

The only card I made over the whole weekend *LOL* The forum that I'm a member of has regular card challenges. It's not something that I normally take part in due to rarely making cards (except at class and then they're not really my own cards but 'copied' from the tutor, with a twist 'cos I never make them exactly the same *LOL*) but always contribute by voting. I have only entered once before, when the subject matched a card I'd partly made a couple of years ago but had never finished. The challenge, at the time, gave me the impetus to finish it. Anyway, I digress .....

Before we went away another challenge was set and I thought it would be good if we could all make a card and send it in. As it turned out quite a few of the ladies had already made one and sent them off before coming away but there were a few of us that hadn't so, with a bit of cajoling .... OK, nagging, *lol*.... I managed to get some that hadn't entered to make one.

The challenge was on the theme of ......... TEDDY BEARS.
The card could be any shape or size but NOT a bookatrix.
Any colour...any teddy/teddies...men, ladies, babies, wedding, whatever theme we liked.
It had to have at least 2 different papers on it. For example a plain and floral, and be finished off with a ribbon.

I'd prepared, when I packed the crafty stuff to take, by throwing in a Sizzix teddy die and a selection of 3D découpage papers, as well as Daisy & Dandelion stamps so there was plenty of choice. As it turned out Jackie, Greta and Nena plumped for découpage papers and Cally for the Sizzix die, which she had also bought with her. 5 of us made our entries over the weekend and I photographed them and sent them in bulk to the organiser.


(Click on an image for a larger version)

I voted, as usual, when the time came but didn't vote for any of the ones I'd seen prior to the 'reveal'. I was really surprised 'cos my offering came 2nd! I was so chuffed.


The teddy came from a StudioLight 3D découpage sheet. Cream, deckle-edged base card distressed with ink. 2 papers layered (don't know what papers they are unfortunately), having corners punched with the new Woodware Inverted Corner Rounder punch (just Google as it's now quite widely available) and again, distressed with ink. A Nestie label, chalked in a golden brown while die still in place and the same with a Spellbinder Ribbon Tag. All bought together with a narrow, cream organza ribbon and a greeting stamped on the tag.


Enjoy!!

Our garden ...

... today! The sun was shining and everything looked quite lush so I decided to take some photos to show how it's progressed since it was finished last year.

From the top ramp looking down.


From the decking area looking down.


From the bottom left (by small shed) looking up.


From the paved area to the plantings.


The bottom of the garden with cordyline from Dad's, well, more technically Mum's, garden and the palm from eldest's when house sold.


The planted area is filling out nicely now and the plant I thought we'd lost last year is growing. Can't see it from the front of the border 'cos the euphorbia is hiding it at the moment but I'm sure it will make it's presence felt at some point *LOL*

The 'nearly before' ..... here
The 'nearly after' (almost a year ago) ..... here
After the planting - September, last year ..... part of this post here

There's still a bit to do 'cos I want to put more containers around and there's also a water feature that needs to be connected up but it's getting there, being completed amidst doing other stuff as well. It's a vast improvement to what we've had for years and it's such a pleasure to wander around.

Thanks for dropping by .....

*Big grin* ...

... well, perhaps not too big but definitely bigger than yesterday *LOL*

Had to call in to Dad today to return one of his hearing aids that I'd taken to have checked out. He actually seemed much happier and had been walking this morning - with the support of the walking frame, admittedly but - at least he'd been walking! He told me he was feeling better and, although he doesn't actually look a lot different his whole demeanor was much improved! He did tell me that there was one carer he didn't like as she was very abrupt and made him feel as though everything was his fault. I told him that I was sure she didn't mean anything by it, that it was just the way she was and to not take it personally but just do what she asked - and under no circumstances to shout at her or be rude! *LOL* Then he pointed her out to me and I completely understood what he was saying! It was the same carer that had made me feel so guilty earlier in the week. Not sure she does realise quite how she comes across so, perhaps a kindly word might not go amiss if the opportunity arises. There is a male carer who is really nice and Dad has grown quite fond of him by the seem of things and he had a little grin on his face when he was talking about him today.

It also seems that Dad might not be so daft after all! He told me yesterday that they'd given him too many pills in the morning and that they'd put his horse-pill sized, soluble, painkillers in the pot with the rest. I assumed, from his description, that the problem was the painkillers being added to the pot and when I asked him how many of his others he had he agreed it was probably the right amount. This afternoon, before I called into him, I got a phone call to tell me that he'd been over-medicated yesterday morning. One of his repeat prescription pills had come under a different manufacturers name and they'd 'assumed' it was an additional pill the inhouse doctor had prescribed. In fact, if they'd checked the generic name (which I always did/do) they were the same so, they gave him a double dose! Wouldn't you think that they'd go by the generic name every time? I knew exactly which one it was as well because it often happens that the manufacturer is different and also the pill can look different - sometimes a plain colour and sometimes with stripes. I couldn't believe that the generic names aren't checked by them as well.... Anyway, it seems he was right and even the carer, yesterday, told me he'd argued over his pills in the morning. Perhaps, if he queries something, they should double-check!

Feel a bit more positive today. about his recovery and hoping that this is a step forward. Still a way to go to get him back to anywhere near normal but it was good to see him a bit happier, if still not the Dad I know!

Thanks for dropping by .....

Crafter's House Party ...

No more slideshows, either here or on the Ramblings but this is instalment number 6 ..... the project one!

As mentioned previously, there was nothing formal planned, just a list of what people were prepared to show/demo/instruct on and a list of tools to play with and materials for use. Everybody contributed something with most people bringing a selection of stamps. There were Cuttlebugs, folders, nesties, dies and a Slice to try. Demos/projects on the list included ....

Beaded Flower
Giant Chrysanth
Watercolouring
Slider card
Prisma colouring
Copics
Basic Backgounds and word circles in Word
Basic FPC pointers
Medallion using corner punch.
Rollagraph
Quilling
Trifold card
Dreamweaver stencil & glitter
and ...... surprises with a possible visit to local craft shops?

I think most were covered even if we didn't all get to do what was listed due to lack of time and other 'stuff'!
I was going to demo the giant chrysanth - didn't happen!
The quilling - going to be demo'd by Jak's Mum - didn't happen although she was quietly quilling at the end of the table and her samples were something else! Beautiful work so, perhaps next time ... if there is one - *LOL*
Dreamweaver stencils and glitter - didn't happen (unless I missed it).
Basic FPC pointers - didn't happen!
Basic backgrounds and word circles in Word - didn't happen!
Visit to local craft shops - didn't happen!
Not sure if the Trifold card happened but I've got measurements and a pattern for a card that could be the trifold ..... *der* senior moment methinks!
I missed the slider card because I was having an Indian Head massage but I've got a template and a piccie of Kim's nearly finished one to go by so, I can play with that later.


(Click on an image for a larger version)

There was one FPC item and it was a 'surprise' one - *hehe* Papercraft Inspirations had a flower made from scalloped circles in the newest mag so we made that - very quick and quite effective although nothing like the geranium they said it was. More of a carnation and ... it could be improved on.

Another 'surprise' on the flower front! We tried a bit of flower pounding - not at all successfully. The pounding, in the Cuttlebug, was fine but the flowers chosen just didn't work. The flowers we tried? Pot chrysanthemums! Yep, just can't get away from 'em but they were far too juicy! Expected the flowers themselves to disintegrate - just didn't expect the watercolour paper to as well *LOLOL* Every attempt ended up in bin and no photographs were taken. Perhaps we should have done to show the disasters as well *hehe*!

There were plenty of images being stamped covering all spectrums of the latest stamps to the oldies but goodies. There were Gorjuss Girls, Magnolia, Olifant, Sugar Nellie, Whipper Snapper, SU sets ... to name a few. There were a variety of colouring mediums to try - Prismas, Copics, paints, watercolour pencils and we took full advantage of some of the experience available.


We made a beaded flower under the expert tuition of Debs, before she was taken ill and rushed to hospital and we made medallions using Corner Adorners - demo'd by Pippa (mine not yet photographed). We - OK, I - made a mess with the Rollagraph, SU wheels and the embossing powder (piccie on Jak's blog). Technically the mess was the embossing powder 'cos I spilt it. Yep, there has to be one and it was me! Loved the end result though and a couple of the wheels are currently on order .... I have the handles as I have several of the Rollagraph wheels anyway.

For me, the piéce-de-résistance was Olly Owl! Toni had made owls out of SU punches and bought with her, what I thought were her examples - a 'standalone' owl and one on a post-it note cover, all made by her fair hand. The surprise came when she gave them both to me! She'd bought them with her as little gifts. How kind was that? Anyway, she also bought the punches with her so punch we did! I didn't put an owl together there but I've made one since I've been home .... and called him Ozzie!


I managed to get a quick lesson in PSP on how to make a watermark for my piccies - which I've promptly forgotten *Doh* and some people trialled the Slice but I didn't get to see it working, although I heard it, 'cos I was busy on the only card I made all weekend ..... to be continued!


Enjoy!!

Sunday, 21 June 2009

Hmmmm!! ...

... I paid a visit (well, it is Father's Day as well as being the longest day of the year)! Youngest son came with me - to see Dad, that is - as he hadn't seen him since the move. He couldn't believe what he saw either! Initial greeting was a look of thunder at both of us but total unrecognition then, penny dropped (at least with me) and I was greeted with - "What the bloody hell are you doing here?" I just replied "Well, I'll go then!" Spent the rest of the visit with an obnoxious old man who kept trying to deny he was being rude to the staff but giving excuses as to why he was! Seems that if they don't do things in exactly the way he wants at the times he wants he throws a wobbly - but he doesn't shout, according to him, and he's not un-cooperative either .... *right!*

I now totally believe what the staff have told me about his behaviour and I'm beginning to think that there have always been 2 different people in him - the one that Mum saw and the one the rest of us saw. Seems as though the one Mum saw is coming to the fore now. Seeing him as he was today was upsetting but - he's obviously not prepared to meet anyone even half way and he won't listen to any explanation as to why it would be better if he cooperated .... like him getting to go home sooner so, I'm starting to lose the guilty feelings. They're being replaced with anger at the moment however, which is not good but, perhaps I need to be a bit sterner with him instead, to try to shake him out of the mood he's in at the moment. I'm now sure that this would have happened even if he hadn't moved because, if he hadn't moved there was going to be a care plan, with carers replacing me, put into place where he was. That would have gone down like a lead balloon as well. It does seem as though he'd become completely dependent on me and doesn't like that it's changed but, he's got to get used to it - like it or not!

He said he wanted to know what had happened to me because he hadn't seen me for so long. He had forgotten I'd spent the day with him on Monday and trying to explain that I'd been doing 'stuff' for him (attending to a broken wardrobe and his washing), even if I'd not seen him, didn't seem to count!

I'll be running around for him, and on his behalf, tomorrow as well ............. and there's also ironing to do at his flat. Seems, although they do his 'laundry' it doesn't include the ironing *LOL*

Thanks for dropping by .....

Crafter's House Party ...

... instalment number 5 ...... the crafting one (for what it's worth *LOL*)

... what fun we had! (Check out the Ramblings for the general story and photos of the House Party)

Nothing formal, just a list of suggestions and offers of demo's with everybody prepared to contribute something, if not by way of demo by way of tools, paper, card, stamps and general materials. Did we get to do it all? No way! From being concerned that we wouldn't have enough, it soon became obvious that there was absolutely no way that we would ever get everything on the list done. Better to have too much than not enough became the philosophy. Some people did very little, even no, crafting, preferring to take the time to totally relax. Then there were some who would have crafted but, in remembering their contribution, forgot to bring their personal tools and couldn't get on with borrowed ones - silly Jak! There was a good variety and choice and there were times when I'm sure we were all doing something different with each concentrating on something they particularly wanted to spend time on.


Clicking on a photo will take you to an album with larger images

Seems I found a period of time when half of us were missing for one reason or another. Lunch, chat, pampering, emergency call to hospital - whatever! On one occasion when I ventured into the Refectory (our craft room for the weekend) there was only one lonely bod working. Seems nothing was going to stop Pat from playing ..... with beaded flowers by the look of it - LOL!

Enjoy!!


Update - 24th June: More piccies added to slideshow, contributed by Jan, so there's less people missing *lol*

Saturday, 20 June 2009

Oh dear ...

... it's certainly back down to earth with a bang! Dad's been playing up again. Had another phone call from the Resource Centre today and they tell me he's being 'rebellious'. He's getting angry and being totally uncooperative. He's not doing anything to help himself yet doesn't want anyone there to help him and shouts at them when they try. They tell me he seems to prefer male carers to female ones (guess that's understandable). He's telling them he hasn't seen me in months and is missing me. Hasn't mentioned anyone else it seems. This carer wanted to know what his normal carers were like and what he is like with them. Bearing in mind, until 3 weeks ago (is it only 3 weeks ago???) his only 'carer' was me - well, couldn't answer that one really, although he seemed OK with those he was getting to know at his new home. She told me that he was very confused and seemed to understand very little of what was going on with him. She said she'd sat with him for about 20 minutes this morning and tried to explain things and he'd quietened down and was sitting reading his papers. Perhaps they need to spend a bit more time explaining things so that he understands, as it could be he's frightened, if he doesn't know what's happening - or why. She told me things that I'd heard before, but from Mum - and we'd always thought that Mum was exaggerating because of her own problems but I am fast coming to the conclusion that perhaps she wasn't and I've just never seen that side of him. The man that this carer described today and the one they were telling me about on Monday, is not the man that I know, although the staff on Monday agreed he had changed dramatically. Dad's always been so laid back, or so he's seemed to us, that he's been nearly asleep! Seems his mobility is still extremely bad and I am having great difficulty in understanding why that should be ...

I shall be calling to see him tomorrow so will see what he's like then and try to talk some sense into him. I don't hold out much hope and really don't know what to do about his behaviour. He's my Dad, not my child! All I can think is that, if his behaviour doesn't change from what it is now and if his mobility doesn't improve, how on earth can he continue to live independently, with or without carers? ... and why do I feel so damned guilty at the whole situation? Why do they make me feel guilty? Perhaps they don't mean to but they certainly do!

Thanks for dropping by .....

Friday, 19 June 2009

Crafter's House Party ...

... instalment number 4 - the foodie one!

We certainly had an assortment this weekend. 'Home cooked' ready made (*LOL*) lasagne, salad, baked potatoes, garlic bread and a selection of puddings for dinner/supper on Thursday ... thought best to allow for varying arrival times. Breakfasts, based on the continental style. Sandwich lunches, snacks of cakes, crisps, biscuits and fruit all keeping the wolf from the door. Friday evening saw us in convoy to Tamworth and The Longwood where our waitress had booked the tables and arranged a welcome discount. Our waitress? Toni's daughter, Sonia. Good food reasonably priced.

Although booked into The Longwood for Saturday night Jean had noticed, in the info on the cottages coffee table, that there was a local pub/restaurant at the top of the road. A quick phone call to them and arrangements were made for us to dine there on the Saturday night and what a good choice that turned out to be! Beautiful, olde-worlde, grade-2 listed building and definitely not the run-of-the-mill pub/restaurant. Much more 'designer-ish' but not, fortunately, overly expensive and .... the food was delicious.


Clicking on a photo will take you to an album with larger images

The waiting staff found our reactions to the arrival of the sweets highly amusing - *LOL*. The first arrived to a reserved "ooooooo", the 2nd one arrived to a slightly louder one and with each different sweet that arrived the "oooooooo" got louder! Then came the "mmmmmmmmm" as they were eaten. The whole meal was delicious and I'm sure, should we ever visit Appleby Magna again, we will certainly be visiting .....
The Black Horse

Here's the Rogues Gallery with some hiding and two down 'cos Debs was languishing in hospital by this time and Jackie was with her. Jackie was ejected from (OK, thrown out of - *lol*) the hospital and got back to us just before we left. Kim had purchased one of the giant wine glasses for her and, with a bit of wheeling and dealing on her part we came away with a bottle of the grape juice and a plate of scampi and chips for Jackie to enjoy back at the cottages ....


It doesn't seem possible that a week ago we were half way through our break and some of us were looking forward to the pamper day on Saturday.
This is the last of the general photos - the next will be the crafty stuff ...... in due course *LOL*


Thanks for dropping by .....