
I've had several queries asking me how the anenome flower is made and it is one of the flowers I had intended showing at the crafty meet that some Southern imag-e-nation forum members had recently. Time, unfortunately, ran out so nobody was able to make any of the flowers I'd hoped to show them, although I managed to do a quick demo. I promised I would try to cobble together a tutorial so here is the first one! This is such an easy, peasy, lemon squeezy flower but it is sooooooo effective. Takes no time to make so is ideal for a quick, but special card ........

TUTORIAL (Click on any image to enlarge)
(Floral Punch Craft tools can be found at Centagraph, who carry the full range)

Tools & requirements:
~ Moulding mat
~ Scissors
~ Tweezers
~ Quilling tool
~ DEET (Double Ended Etching Tool)
~ Shape mate
~ PVA glue (fine tip applicator)
~ Black (or dark brown) Chalks
~ EK Success Papershaper Retro Flower or X-Cut Flower punch
~ Coloured paper for petals and black paper for flower centre.
~ Moulding mat
~ Scissors
~ Tweezers
~ Quilling tool
~ DEET (Double Ended Etching Tool)
~ Shape mate
~ PVA glue (fine tip applicator)
~ Black (or dark brown) Chalks
~ EK Success Papershaper Retro Flower or X-Cut Flower punch
~ Coloured paper for petals and black paper for flower centre.

METHOD:
Step 1: Using either punch but the same one each time (I've used the X-cut one here), punch 2 shapes from your choice of coloured paper for the flower petals
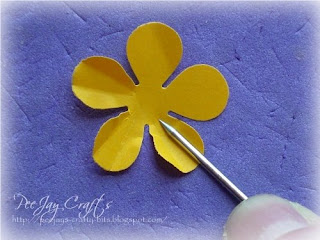
Step 2: Place the punched shapes on the moulding mat (dense foam mat). Take the DEET tool (or a pokey tool, darning needle or something similar with a point) and, keeping the tool as flat as possible, score 2 lines on each petal from the base to the edge, dividing the petal into 3 sections.

The punched shapes should look like this ....
.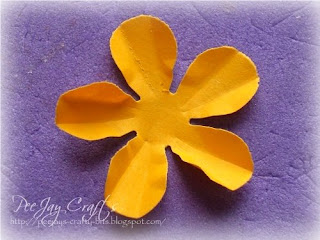


The punched shapes should now look like this .....

Step 4: Turn the punched shapes over. Take the shape mate (large embossing ball) and, using light pressure make small, slow, circular motions in the centre of the punched shapes until they 'cup' very slightly.

Step 5: Using black (or dark brown) chalks, lightly chalk from the centre of the punched shape to the edge, getting lighter as you near the edge. The ridges will take the chalk, rather than the 'valleys'.

Step 6: Put a small dot of wet glue in the centre of one punched shape and place the other over the top, off-setting the petals, and holding gently in place until secure.
The shapes should now be looking like this .....

Step 7: Take a strip of black paper, approximately 8 inches long by ¼ inch deep (I usually trim the short side of an A4 sheet of paper using a paper trimmer) and fold it in half, twice.
If using the Papershaper Retro Flower punch the paper strip needs to be a little deeper as the punch is slightly larger than the X-cut punch.

Step 8: With your scissors snip along the edge, cutting to near the bottom of the strip to create a fringe but leaving a small (tiny) border at the bottom.

Step 9: Unfold the strip to show the fringe, full length and, with the exception of the very ends, dot tiny spots of glue at approximately 1 inch intervals along the uncut border.

Step 10: Place one end of the strip into the quilling tool (or hold with tweezers if you prefer) and roll to form a tight, fringed coil.

Step 11: Place a small dot of glue at very end of strip and use this to fasten the coil. Hold until glue adheres (image far right)

Step 12: Using your fingers, pokey tool, tweezers or the flat end of your DEET tool (which is my preference), if you have one - 'fluff' out the cut fringe of the coil.

Step 13: Put a good 'blob' of glue in the centre of your punched shapes and position the 'fluffed' coil in the centre. Put light pressure on and hold until the glue adheres.

Step 14: Flower ......... FINISHED!!

The picture, below left, is to show the size difference between the 2 punches - EK Success Papershaper Retro Flower to the left and the X-cut Flower punch to the right. The picture on the right shows 3 flowers made from irridescent vellum. There is no chalking on these flowers.


To see my all-time favourite FPC card I made using this flower take a look here
Enjoy!!

13 comments:
Another great tutorial Pam! I have both those flower punches, so who knows, I may just give this one a try!
Arhhhhh I see it now 2 layers and a different flower lol! fab tut.
Absolutely brilliant tut. Those little flowers look so real. Thank you for taking the time to share them with us. xx Lynn xx
Great tutorial, thanks Pam.
Susan
Will try these out
TFS
carol aka Cadge
This is a superb tutorial, thanks for posting such great photo's too. I must try of this technique.
Billie
Nice little flowers look so easy will have to buy more punches
thanks
Thankyou for sharing. Great tutorial, will have to get some punches. Cheers
Thank you for the tutorial. I shall try to make some flowers today!
Great Tutorial
TFS
Happy Tuesday
Well done and a must do! I came over for a visit from Crafters Kitchen and so glad I did. You make it look so easy. Ty for the wonderful tutorial
Why has it taken me so long to find this web site???
Wow love this tutorial.
Have to try this just ordered some tools
Can anyone advise what type of paper or card is the best to use please?
Very nicce!
Post a Comment