
A quick and easy one which is very versatile and can be made any size you like within the confines of the size of the piece of card used. Make a small version and use it as a topper, closed by pretty ribbon and bow. Make a larger version and make a card like this one ......

TUTORIAL (click on any image to enlarge)

Tools & Requirements:
-Ruler
-Pencil
-Bone folder
-Embossing ball tool
-Piece of card. (Length should be 3x the height).
If you prefer you can use a score board
METHOD:
Step 1: Measure and mark your piece of card to divide into 3 equal sections - marking both top and bottom of longest length. The card I've used is 4inches high by 12 inches long (a third of a 12x12 sheet of Bazzill) so I measured at 4inches and 8inches.

Step 3: Fold and set crease with a bone folder.

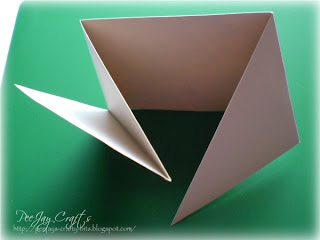
Step 4: Next you need to score from corner to corner on the outside sections. It doesn't matter which way you score, from top right to bottom left or from top left to bottom right, as long as you score in the same direction on both sides.


Step 6: Fold the 2 sides over the centre panel.

There's a few things I've found having made a couple of these cards now.............


The card to the right was scored, on the diagonal, from top right to bottom left.
Enjoy!!

Step 1: Measure and mark your piece of card to divide into 3 equal sections - marking both top and bottom of longest length. The card I've used is 4inches high by 12 inches long (a third of a 12x12 sheet of Bazzill) so I measured at 4inches and 8inches.

Step 2: Score between the marks, top to bottom

Step 3: Fold and set crease with a bone folder.

Step 4: Next you need to score from corner to corner on the outside sections. It doesn't matter which way you score, from top right to bottom left or from top left to bottom right, as long as you score in the same direction on both sides.


Step 5: Crease and fold on these scorelines using your bone folder for a sharp edge


Step 6: Fold the 2 sides over the centre panel.


.
Step 7: Card FINISHED!!
There's a few things I've found having made a couple of these cards now.............
~ If you're using a card that's textured one side and not the other - like Bazzill - and you're going to cover the front with backing paper, then my preference is to have the texture as the card inner. That's the part that will be seen when the card is opened. To get a nice finish to the inside of the card, in this instance, I do my scoring on the textured side of the card and then the neatest part of the crease will be the visible part.
~ If you're using 12x12 to cut your card from you can get 3 - 4x4 inch cards or, for toppers, 12 - 2x2 inch or 5 - 3x3 inch and any combination inbetween - lol!!. Just remember that the length always needs to be 3 times the height of the card.
~ For balance, and so they stand securely, if you're going to use as a card and not a topper, it's best to embellish the bottom section, otherwise the card is top-heavy.
~ If you don't want the 'flappy' bits, try cutting them off, or even sticking them down. If not both, you could try cutting or sticking the top one.


The card to the right was scored, on the diagonal, from top right to bottom left.
The card to the left was scored, on the diagonal, from top left to bottom right.
Basically, just play. This is a very versatile fold so .......
Enjoy!!
4 comments:
Another great tutorial Pam, well done! Just love both the cards you've made.
Looking forward to the next one...
Another brilliant, easy to follow tutorial. You definitely have a knack for them, well done
Another excellent tut Pam.Very easy to follow
Greta x
Great tutorial Pam I really must try this as the finished results are fab.Thanks for explaining
Myrax
Post a Comment